If you're still using macOS screenshots with the default settings, your desktop is probably drowning in PNG files with long, date-stamped names. The good news is that almost every aspect of the screenshot tool — the save location, the file format, the filename, even the drop shadow around captured windows — can be customized. Some options live in the familiar ⌘+Shift+5 toolbar, but the real power comes from a handful of defaults write commands in Terminal. This guide walks through every setting worth knowing.
Table of Contents
- Screenshot Shortcuts at a Glance
- Change Where Screenshots Are Saved
- Change the File Format
- Change the Filename
- Remove the Drop Shadow from Window Captures
- Other Settings Worth Changing
- Revert to the Defaults
- Wrapping Up
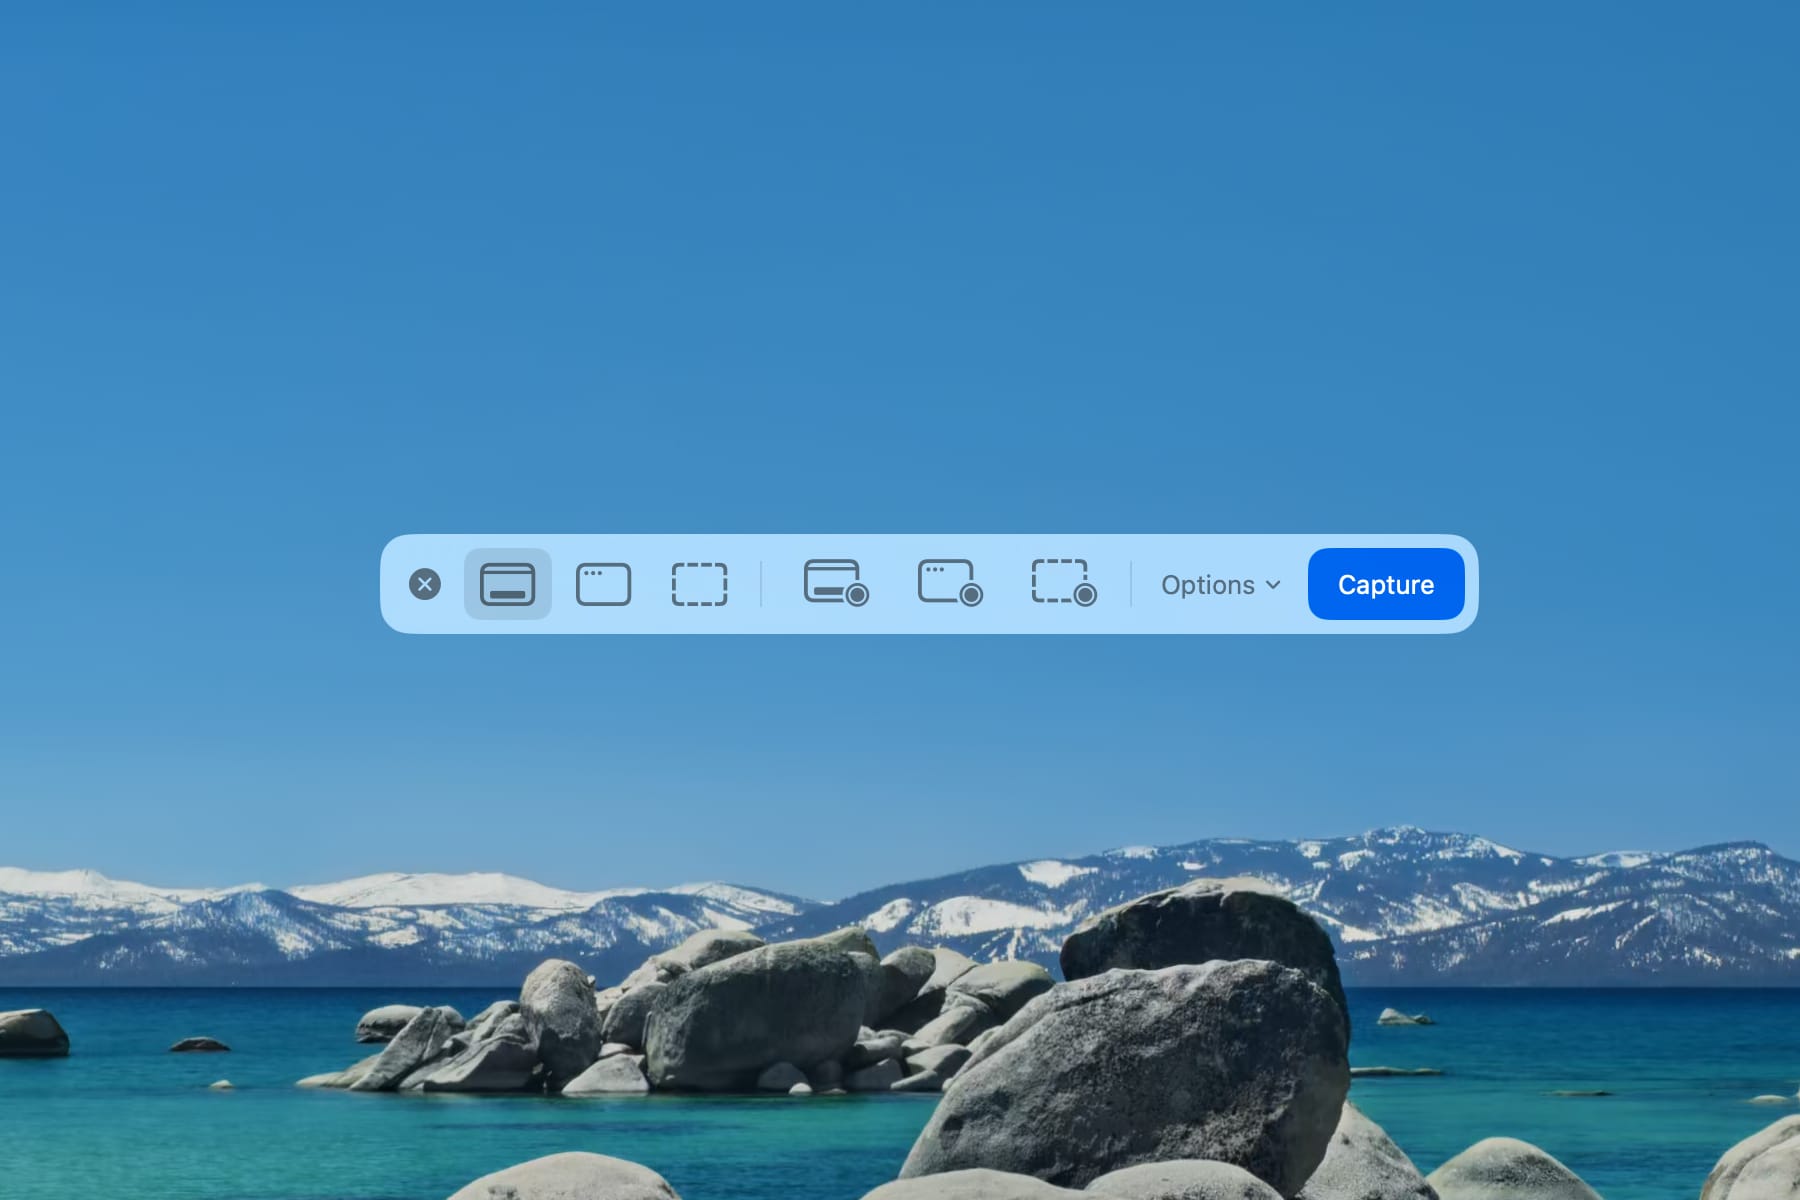
Screenshot Shortcuts at a Glance
Before getting into the customizations, it helps to be clear on the four main shortcuts. Each of them respects the same settings, so tweaking any preference affects all of them at once.
| Shortcut | What It Does |
|---|---|
| ⌘+Shift+3 | Captures the entire screen and saves it to a file |
| ⌘+Shift+4 | Lets you drag to select a region |
| ⌘+Shift+4 → Space | Switches to window-selection mode |
| ⌘+Shift+5 | Opens the screenshot toolbar (video recording lives here too) |
Because every shortcut writes to the same destination, in the same format, with the same naming rules, a single change propagates to all of them. That's what makes the settings below worth the few minutes it takes to configure them.
Change Where Screenshots Are Saved
Use the ⌘+Shift+5 Options Menu
The built-in way to change the save location is through the screenshot toolbar.
- Press ⌘+Shift+5 to bring up the toolbar.
- Click Options.
- Under Save to, pick a destination.
You'll see the usual suspects — Desktop, Documents, Clipboard, Mail, Messages, Preview — plus an Other Location… entry that opens a file picker. For most users this is enough, but the menu only remembers a handful of folders and doesn't let you script or automate the change.
Set Any Folder via Terminal
To point screenshots anywhere on your Mac, open Terminal and run:
mkdir -p ~/Pictures/Screenshots
defaults write com.apple.screencapture location ~/Pictures/Screenshots
killall SystemUIServer
The first line creates the destination folder. If the folder doesn't exist, macOS silently drops the screenshot, so never skip this step. The third line restarts the menu bar process so the change takes effect immediately; you'll see the menu bar blink once, but none of your open apps are affected.
Send Screenshots Straight to the Clipboard
Sometimes you don't want a file at all — you just want to paste the image into Slack, a doc, or an email. Hold down Control along with the usual shortcut:
- ⌘+Control+Shift+3 — full screen to clipboard
- ⌘+Control+Shift+4 — region to clipboard
Nothing gets written to disk, so your Desktop stays clean and you can paste immediately with ⌘+V.
Change the File Format
PNG vs. JPG vs. PDF vs. HEIC vs. TIFF
PNG is the default and it's a reasonable choice, but it's not always the best fit. Here's a quick guide to the alternatives.
| Format | Characteristics | Good For |
|---|---|---|
| PNG | Lossless; larger files | Text-heavy screens, reference shots |
| JPG | Lossy; noticeably smaller | Web uploads, social posts, photo-heavy captures |
| Print-friendly; retains vector-like sharpness when scaled | Documents meant to be printed or archived | |
| HEIC | Smallest files of the bunch; optimal in Apple ecosystems | Sharing between Mac and iPhone |
| TIFF | Lossless, editor-friendly | Print production, image editing source files |
For anything you plan to upload to the web, switching to JPG is the easiest win. For Apple-to-Apple sharing, HEIC gives you the smallest files with no visible quality loss.
Switch Formats with a Terminal Command
One command changes the format for every screenshot from that point on:
defaults write com.apple.screencapture type jpg
killall SystemUIServer
Swap jpg for png, pdf, heic, or tiff to pick a different format. In practical terms, switching from PNG to JPG typically cuts file size by 30–50%, and HEIC can shave off closer to 60–70%, depending on how busy the screenshot is.
Change the Filename
By default, macOS names screenshots something like Screenshot 2026-04-19 at 11.02.45 PM.png. It's descriptive, but it's also verbose, contains spaces, and the prefix is localized in whatever language your Mac is set to. Two defaults keys let you clean that up.
Replace the Default Prefix
To change the leading word from Screenshot to something shorter:
defaults write com.apple.screencapture name "shot"
killall SystemUIServer
From here on, files are named shot 2026-04-19 at 11.02.45 PM.png. The biggest win is switching to an ASCII-safe, short prefix, which makes shell scripting, uploading to services that don't like spaces, and working across different locales much smoother.
Strip the Date and Time
If you don't need the timestamp, you can remove it entirely:
defaults write com.apple.screencapture include-date -bool false
killall SystemUIServer
Combined with a short prefix, your files will come out as shot.png, shot 1.png, shot 2.png, and so on. This is ideal when you're capturing a batch of images in a specific order and want Finder's alphabetical sort to match the shooting order, or when you'll be zipping everything up and don't want the zip to be cluttered with long names.
Remove the Drop Shadow from Window Captures
When you capture a single window (⌘+Shift+4 → Space → click), macOS adds a generous drop shadow around the window. It looks nice in a presentation, but it wastes space in blog posts and documentation, and the transparent shadow border can cause layout quirks. Here's how to get rid of it.
Disable Shadows Permanently
defaults write com.apple.screencapture disable-shadow -bool true
killall SystemUIServer
Going forward, window captures come out as clean rectangles with no shadow and no extra transparent padding. File sizes drop too, which is a bonus if you upload a lot of images.
Skip the Shadow Just This Once
If you like the shadow most of the time but want a clean capture for a specific shot, hold the Option key as you click.
- Press ⌘+Shift+4.
- Press Space to enter window-selection mode.
- Hover over the window you want.
- Hold Option and click.
No settings are changed — the next window capture goes back to its usual behavior. Think of it as a one-shot override.
Other Settings Worth Changing
Turn Off the Floating Thumbnail
After each capture, macOS parks a preview thumbnail in the bottom-right corner for a few seconds before actually writing the file. It's useful if you want to mark up the shot right away, but it's a real drag when you're trying to capture several screens back-to-back, because the file doesn't exist until the thumbnail fades.
There are two ways to turn it off.
From the toolbar:
- Press ⌘+Shift+5.
- Click Options.
- Uncheck Show Floating Thumbnail.
Or via Terminal:
defaults write com.apple.screencapture show-thumbnail -bool false
killall SystemUIServer
Include the Mouse Cursor
If you write documentation or tutorials, you'll often want the mouse cursor visible in your shots. The ⌘+Shift+5 options menu doesn't expose this, but one command does.
defaults write com.apple.screencapture showsCursor -bool true
killall SystemUIServer
Flip true to false to hide the cursor again. This setting applies to regular screenshots only; the cursor visibility for interactive captures from the ⌘+Shift+5 toolbar is controlled separately.
Use the Built-in Timer
Some elements disappear the moment you move the mouse — tooltips, context menus, hover states. A delayed capture gives you time to set up the shot.
- Press ⌘+Shift+5.
- Click Options.
- Under Timer, pick 5 Seconds or 10 Seconds.
- Press the capture button. The countdown begins.
During the countdown you're free to open menus, hover over elements, or move the mouse out of the way. When the timer hits zero, macOS captures whatever is on screen at that moment.
Revert to the Defaults
If you ever want to roll back any of these changes, defaults delete removes the override and macOS falls back to its built-in behavior:
defaults delete com.apple.screencapture location
defaults delete com.apple.screencapture type
defaults delete com.apple.screencapture name
defaults delete com.apple.screencapture include-date
defaults delete com.apple.screencapture disable-shadow
defaults delete com.apple.screencapture show-thumbnail
defaults delete com.apple.screencapture showsCursor
killall SystemUIServer
You can run only the lines you want — there's no need to reset everything. If one of the commands reports an error, it just means the key was never set in the first place, which is fine.
Wrapping Up
The ⌘+Shift+5 toolbar is perfectly serviceable for casual screenshotting, but it barely scratches the surface of what macOS actually supports. With a handful of defaults write com.apple.screencapture commands, you can set the save location to any folder, swap the format to JPG or HEIC to save space, replace the verbose default prefix with something short, drop the date from filenames, and get clean window captures without drop shadows.
These settings pair nicely with the way you work. A blogger might run JPG format, no shadow, an img prefix, and no floating thumbnail. A writer working on documentation might prefer PDF output, the cursor visible, and a timer for menu captures. The setup is a one-time investment that keeps paying off with every screenshot you take afterwards.